The proof of the pudding is in the eating, and there are many different ways to make this particular pudding. As I say in the section Dutch Women's Clothing in 16th Century Antwerpen Market Scenes, there are many possibilities for the construction of the overdress. The following information is how I construct mine. I am going to assume basic sewing knowledge throughout this guide - techniques like flat lining, etc. If you don't have an existing bodice pattern to modify you'll need to make a body block for your bodice pattern. You can either drape or draft one. There are tutorials online for both methods. If anything is not clear, I apologize. Please e-mail me if you need clarification or ask me in person!
I've only ever seen one obviously visible seam across the paintings on a Dutch market dress and it's at the shoulder. This is seen in the two detail images that follow.
I've only ever seen one obviously visible seam across the paintings on a Dutch market dress and it's at the shoulder. This is seen in the two detail images that follow.
Just because we can't obviously see other seams doesn't mean they aren't there. On the detail shot below, I can see some sort of distortion where a side seam would be. It is clearer on my computer then it is when I enlarge the image here, but I hope you can still see it. This could possibly be a crack in the painting. It is difficult to say.
I've also found one side seam depicted in Cornelis Matsys' Loose Company. I don't have a scanner anymore, so here's a cell phone picture of the engraving which is in Larry Silver's Peasant Scenes and Landscapes: The Rise of Pictorial Genres in the Antwerp Art Market. It is on page 105 and of course I cannot find it anywhere online! It's also the only crystal clear image I've seen.

I believe the reasons we can't often see a side seam on the women is because their arms are in the way most of the time. They're cooking, they're selling vegetables. Also the artists generally don't seem too concerned with the overall seam depictions in most of the paintings. I believe they are more focused on the overall theme of these genre images versus the details. I had to hunt down a man with visible side seams. The next image is from a man's jerkin. He's holding a drink above his head.
Because there is a side seam on a man in the paintings contemporary to the women of the market scenes, one contemporary example of side seams in an engraving, and side seams are present in some of the 15th century early Netherlandish paintings depicting women’s kirtles, I believe side seams on this style of dress are justifiable.
It's a way to eke pieces of a body out of bits of fabric leftover after cutting sleeves or skirt. For ease of adjustment if weight is lost/gained I keep a center back seam and two side seams on my overdress bodice. You may or may not want to have a back seam, but I strongly encourage having side seams. Below is a poorly drawn curved front bodice pattern that I use for 15th century German dresses. It's essentially a body block. The dotted line is what I cut away to get the bodice of the Dutch market overdress. (When I cut the front away, it is actually straight. I just fail at basic art skills). The difference between your bust and waist measurement is what is going to give you the appearance of the diagonal bodice front that is visible in some of the paintings, not cutting it at an angle.
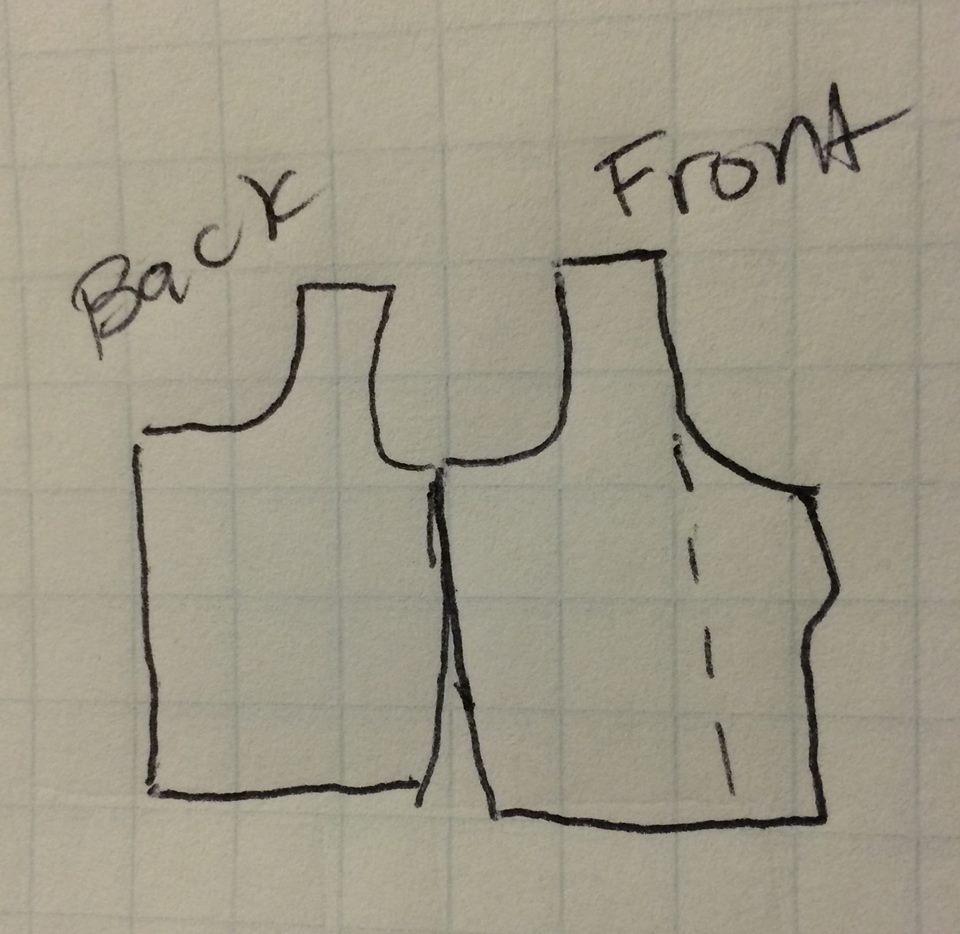
You will cut two back pieces and two front pieces out of your (ideally) wool fabric. The bodice length will run parallel to the selvedge of your fabric. I line my bodices with one layer of medium weight linen. I do this because the paintings tend to depict a ton of wrinkles in the bodice which indicates they are probably not lined with anything incredibly stiff. I line my bodices with one layer of linen because many if not all of the garments in Arnold’s Patterns of Fashion 1 are lined, although they are admittedly of a higher class than the Dutch market dresses. Of course, there's always the smoother overdress bodices to consider, but they occur less frequently than the wrinkled examples.
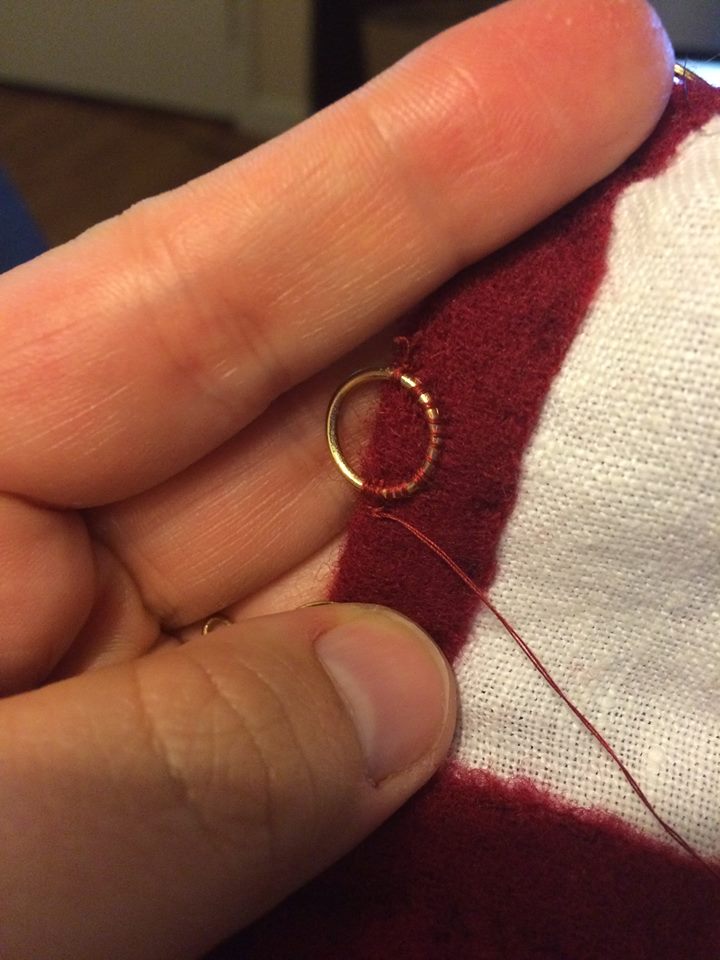
I machine sew the long seams. I press the seams open, trim the linen lining so that it's just just under the wool, and handsew the wool over the raw linen edge using a whip stitch or a running stitch. If you don't want to do this, you could always serge the linen lining to keep it from fraying and then just press the seams open. I also fold up the bottom of the bodice by my usual seam allowance which is .5”. This may seem wider than the types of seam allowances we believe were taken historically, but “in the case of unfulled fabrics” wide seam allowances were taken (Zimmerman 385). I hand finish the neck, armscyes, and bodice bottom. I find it easiest to finish the armscyes when the bodice is flat, that is when the shoulder straps are not sewn together. When it comes to lacing the dress closed, I use cast bronze curtain rings that are 3/8" in diameter. If you're not sure how to space them, Jen Thompson of “Festive Attyre” has a helpful tutorial, The Zen of Spiral Lacing. The distance between your rings depends on your height. I use 1”, but if you are shorter you may want them to be spaced closer together. Follow Jen’s guide for lacing across a wide opening. The lacing rings in paintings could extend from the bottom of the bodice to under the bust or above the bust or even mid-bust.
I sew about half the ring to the bodice and have half poking off the edge of the bodice.
Sometimes you lose a ring in wear, but it’s not the worst thing in the world; just attach another one. I lace my bodices closed with ¼” linen tape. Using the proper type of dye you can dye it to reflect the color variation seen in the paintings, where the laces are not just a natural color. As I stated in the overview, they come in many different colors. I have seen them in a natural linen color, green, brown, a golden color, and gray. An important thing to note with the laces and ties is that according to the finds in Groningen in Textiel in Context is that “several cut-off selvedges used as straps or garters” (Zimmerman 384). It is difficult to say if these dresses were laced closed using selvedges or woven tape, but it is a possibility.
Measure from the bottom of the front of the bodice to where you want the skirt to end. I have mine end between mid calf and my ankle. Before you take off the bodice take note of the width between the front edges of the bodice. For example, 7". This is important later.
Measure from the bottom of the front of the bodice to where you want the skirt to end. I have mine end between mid calf and my ankle. Before you take off the bodice take note of the width between the front edges of the bodice. For example, 7". This is important later.
Now it's time to make the skirt! The skirt consists of two trapezoidal pieces sewn together on the straight (back pieces), which gives a correct look of a flare to the skirt, and two rectangular pieces (front pieces) sewn to the bias of the back pieces. The pleats stop at the hip/side seam or about 2-3 inches back from this point. Where you stop them is personal preference. The hem circumference on the skirt tend to be rather narrow. I try to keep mine between 90 and 105” inches. Sometimes for plus size women, that can be difficult because you’ll have to clear your hips and your stomach and in that case a wider hem is what you’ll have to do, but again it is really dependent on what 3 times the back piece is and if it leaves enough flare for the skirt to clear your hips and stomach.
And now it’s time for math! The top of the back pieces will be 3 times the measurement of a back panel (or to where you want your pleats to stop) plus the seam allowance times 2.
And now it’s time for math! The top of the back pieces will be 3 times the measurement of a back panel (or to where you want your pleats to stop) plus the seam allowance times 2.
3 x (back panel measurement or wherever you want pleats to end )+Seam allowance x 2.
In the case of a dress I worked on, it looked something like this. (5.75x3)+1
In the case of a dress I worked on, it looked something like this. (5.75x3)+1
And that is how you calculate the width of the top of the back pieces
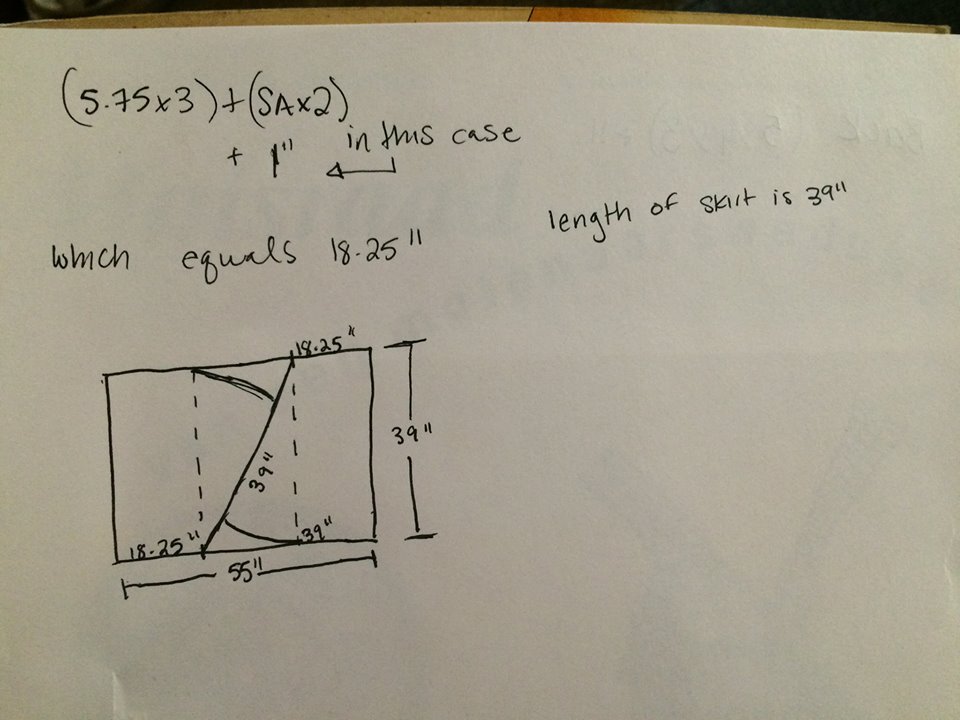
After a little bit of geometry, your skirt pieces should look like the above. This part of the skirt is where most of the fabric in the hem circumference comes from. In this case it’s basically 55-18.25=36.75x2=73.5” (minus the seam allowance). Cutting the skirt panels on one piece like this will not work if your fabric has a right side and a wrong side. In case it does have a right side and a wrong side, you can have one trapezoidal piece and one rectangle cut from the same length of fabric, like so.
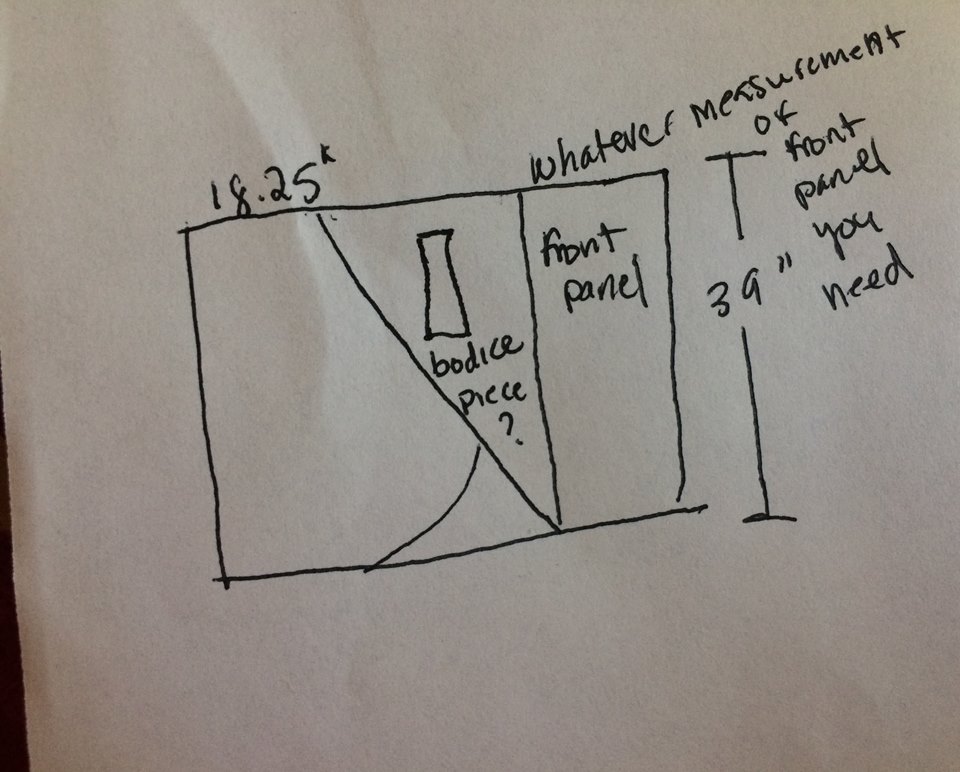
The front panel skirts are a little easier. They may be just rectangles but the math train doesn’t stop with the back panels of the skirt. I knife pleat the front panel at the side seam but you could forego this. There is pictorial evidence either way. In any case you don’t want the measurement of the rectangles to be more than 3 times the front panel + ½ of the gap across the front of the body + seam allowance. If the gap across the body is 7”, this will be 3.5”
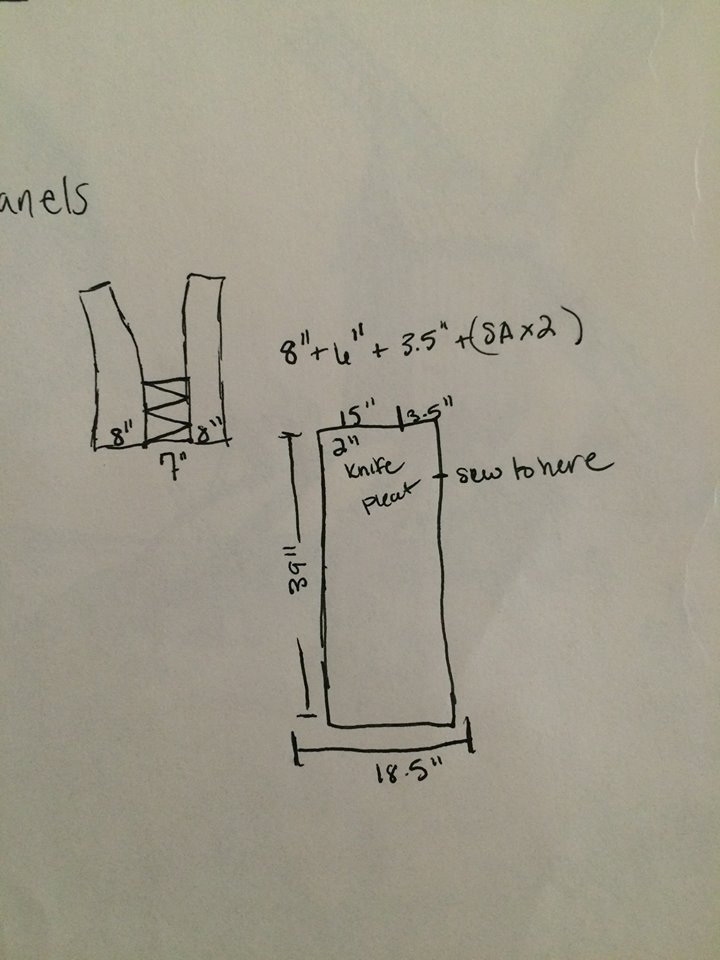
The 6” is for a 2” deep knife pleat but you could do 3x the 8” and leave it at that for a really deep knife pleat across the front. It will change the hem circumference, though.
You can line your skirt or not. They are painted both ways. The detail from Beuckelaer’s The Four Elements (Fire) shows what I believe is skirt flipped up and tucked into her laces.
You can line your skirt or not. They are painted both ways. The detail from Beuckelaer’s The Four Elements (Fire) shows what I believe is skirt flipped up and tucked into her laces.
In Maritgen’s inventory she had eene saeye bouwen mit zwarte voering mit een opperlijf mit mouwen (a say skirt with black lining with a bodice with sleeves). I tend to not line my skirts because it gets quite warm in California. If you do line the skirt, I would do so in linen to minimize bulk. Again, I machine finish the long seams. Sew the center front seam together to about 6" from the skirt top. Press the seams flat. I don't tend to stitch all of the skirt seams down because the wool usually won't fray, but you could do it if you wanted to. Fold the top of the skirt over by whatever your seam allowance is and finish it with a running stitch or a whip stitch. Definitely finish the center front 6” you left open, because you will sew hooks and eyes onto this portion of the skirt to close it.
Now you are going to attach the skirt to the bodice. Here's where things can get a little complicated. Remember the 7" measurement between the edges of the bodice? 3.5" from the center front of the skirt is where your bodice will attach to the skirt on either side. I attach my skirt using about an inch of whipstitching at the front pieces to secure it, then I move on to the back panels and box pleat them and then whip stitch them on. When I hit the side seams, I do a knife pleat of the depth I allowed for, and then whip the rest of the skirt on.
The kirtle is constructed much the same way, minus the cut away in the bodice at the front. The kirtle has side lacing and the same number and type of skirt panels which are sewn up until about 6” from the bodice at the two side seams.
The linen smock can be constructed in a number of ways. There are extant smocks in Janet Arnold’s Patterns of Fashion 4: The Cut and Construction of Linen Shirts, Smocks, Neckwear, Headwear and Accessories for Men and Women C. 1540-1660 that are narrower at the shoulder then widen as they continue down the body. As someone who is one to two sizes smaller in tops than pants, I find this to be comfortable for me personally. The Tudor Tailor by Jane Malcom-Davis and Ninya Mikhaila also features several smock layouts, though they are entirely rectangular in the body. As I stated in the overview section, your smock can have either a square or a rounded off neck, it’s a matter of personal preference. Regardless of neck style, you will want to be able to roll your sleeves up to your elbow.
The pin on sleeves look like they could be shaped at the sleeve cap. I have used a triangular shaped sleeve cap, but in future I may use my 15th century long sleeve pattern which tapers very slightly at the wrist to make my sleeves. Either way there’s no elbow bend in my sleeve pattern pieces because they are loose to begin with.
The pictorial evidence is that coifs do not cover the ears of these women. Because I don’t have very much hair, my unfinished coif dimensions were 10x14.” I used the selvedge edge of the linen to make the casing for my coif tie. Patterns of Fashion 4 has many examples of coifs, though they are English, and they cover the ears.
I think the veils are simple wired or unwired rectangles and are totally dependent on the general time you’re aiming for. The measurements change a bit depending. I use 16 gauge wire in my veil, though I think fine might be better. I used what I had on hand and have no experimented with them.
Because I had a rather large derriere (44" waist, 55" hips), my apron was a 1 yard long, 57” wide rectangle. The linen tape is attached about 12” from the corners of my rectangle. Now that I've shrunk considerably I would use less. Your apron width and length is totally dependent on your measurements but normally in the paintings the apron stops a bit before the hem of the overdress. In any case, if you are “dog earing” your apron, the floppy corners should start around your hips or further back.
My white linen partlets are rectangular. I don’t have any shaping around my armscye. I’m not entirely sure their partlets were as perfectly sized as we tend to make ours. In the top left image below, you can see wrinkles on the shoulder of a partlet. To me it appears that the wrinkles are from the partlet being wider than her shoulder and the width of the partlet is pinned down and around the side of the bust under the arm. Something similar is happening in the top right detail. The bottom two details show untucked partlets.
Marion McNealy of “The Curious Frau” has taken photos of an extant German linen partlet. It is currently located in the Hällische-Fränkische Museum in Schwäbisch Hall, Germany. It is believed to have been made around 1560. Here you can see the rectangular panels and lack of shaping around the arm
Into my collar I’ve gathered a band that is about 3 times the collar width. Four times probably would have worked out better and given more of the look seen in the paintings. Sometimes the gathers even appear to be set like a ruff. I do suggest air drying/drip drying your partlet or pressing it dry. It keeps it nice and stiff even though it’s not starched.
For a black wool partlet in the style of a gollar or the squared off style, you will want it to have a collar as well. I’m not sure if it’s best to have it be integral or not on the square styles. Further experimentation is required.
As far as constructing fabric stockings goes, when I do make them I plan on flat felling the seams and having them on the outside. Currently my fabric stockings are ones I have purchased.
Shoes will complete your look. Generally the shoes have a rounded toe, are unadorned, and are flat and black. Sometimes the women are wearing clogs. I am not a shoemaker, and my shoes are purchased from someone who is.
Works Cited
Deceulaer, Harald. Entrepreneuers in the Guilds: Ready-to-Wear Clothing and Subcontracting in late Sixteenth- and early Seventeenth-century Antwerp. Textile History Volume 31 (2000): 133-149. Print.
van Dongen, A.G.A., J.A. ter Molen, and A.P.E. Ruempol, eds. Huisraad van een molenaarsweduwe. Rotterdam: Museum Boymans-Van Beuningen, 1986. Print.
Geyl, Pieter. History of the Dutch Speaking Peoples 1555-1648. Phoenix Press, 2001.
Honig, Elizabeth Alice. Painting and the Market in Early Modern Antwerp. Yale University
Press, 1998.
Kloek, Wouter. "Het probleem van het samenstellen van het oeuvre.". Nederlands Kunsthistorisch Jaarboek 40(1989): 1-28.
Mikhaila, Ninya and Jane Malcom-Davis. The Tudor Tailor. Costume and Fashion Press, 2006.
Tracy, James D. Holland Under Habsburg Rule, 1506-1566: The Formation of a Body Politic. Berkeley: University of California Press, 1990.
Zimmerman, Hanna. Textiel in Context. Stichtung Monument & Materiaal, 2007.
Copyright © 2015 by Allison Skewes.
Comments
Post a Comment